Context 深入源码分析
基础篇中已经介绍了Go语言Context的使用方法和场景,本节我们来深入了解一下Context的源码实现。
关于Context
Context本质是一个接口,定义如下:
type Context interface {
	Deadline() (deadline time.Time, ok bool)
	Done() <-chan struct{}
	Err() error
	Value(key any) any
}
其中:
Deadline()返回Context的截止时间,返回值为截止时间和一个布尔值,表示是否设置了截止时间。如果返回的布尔值为false,表示没有设置截止时间。Done()返回一个只读的channel,当Context被取消或者截止时间到达时,该channel会被关闭。在没有关闭之前,从channel读取会一直阻塞。Err()返回Context被取消的原因,如果Context没有被取消,返回nil。Value()返回Context中存储的值,key为任意类型,value为任意类型。
空的Context
我们知道
Background()和TODO()返回的Context常用于根节点,无法取消,也没有超时时间,也获取不到任何共享数据。这种空Context是怎么实现的呢?Background()返回 backgroundCtx{} 类型的Context
func Background() Context {
	return backgroundCtx{}
}
TODO()返回 todoCtx{} 类型的Context
func TODO() Context {
	return todoCtx{}
}其中:backgroundCtx和todoCtx都是继承了emptyCtx结构体。
type backgroundCtx struct{ emptyCtx }

type todoCtx struct{ emptyCtx }
emptyCtx 是一个空的Context结构体,它实现了Context接口的所有方法。
type emptyCtx struct{}

func (emptyCtx) Deadline() (deadline time.Time, ok bool) {
	return
}

func (emptyCtx) Done() <-chan struct{} {
	return nil
}

func (emptyCtx) Err() error {
	return nil
}

func (emptyCtx) Value(key any) any {
	return nil
}emptyCtx仅仅实现了Context接口方法,却什么也没做。
传递数据的Context
WithValue()函数用于创建一个携带了键值对的Context,用于传递数据。
func WithValue(parent Context, key, val any) Context {
	if parent == nil {
		panic("cannot create context from nil parent")
	}
	if key == nil {
		panic("nil key")
	}
	if !reflectlite.TypeOf(key).Comparable() {
		panic("key is not comparable")
	}
	return &valueCtx{parent, key, val}
}其中:valueCtx定义如下:
type valueCtx struct {
	Context
	key, val any
}
其中:
- Context是接口,存储了父Context实例。
key和val是任意类型的键值对。
从上面可以看到一个valueCtx只存储一个键值对。那么多个键值对的父子如何共享数据的呢?
func (c *valueCtx) Value(key any) any {
	if c.key == key {
		return c.val
	}
	return value(c.Context, key)
}

func value(c Context, key any) any {
	for {
		switch ctx := c.(type) {
		case *valueCtx:
			if key == ctx.key {
				return ctx.val
			}
			c = ctx.Context
		case *cancelCtx:
			if key == &cancelCtxKey {
				return c
			}
			c = ctx.Context
		case withoutCancelCtx:
			if key == &cancelCtxKey {
				// This implements Cause(ctx) == nil
				// when ctx is created using WithoutCancel.
				return nil
			}
			c = ctx.c
		case *timerCtx:
			if key == &cancelCtxKey {
				return &ctx.cancelCtx
			}
			c = ctx.Context
		case backgroundCtx, todoCtx:
			return nil
		default:
			return c.Value(key)
		}
	}
}我们可以看到value()函数会递归遍历父Context,直到找到key对应的value。
可取消的Context
取消的接口定义如下:
type canceler interface {
	cancel(removeFromParent bool, err, cause error)
	Done() <-chan struct{}
}
Go语言可取消的Context定义如下:
type cancelCtx struct {
	Context

	mu       sync.Mutex            // protects following fields
	done     atomic.Value          // of chan struct{}, created lazily, closed by first cancel call
	children map[canceler]struct{} // set to nil by the first cancel call
	err      error                 // set to non-nil by the first cancel call
	cause    error                 // set to non-nil by the first cancel call
}
其中:
Context是接口,用于存储父Context。mu是互斥锁,用于保护done、children、err和cause字段。done是一个原子值,用于保存一个chan struct{}类型的值,该值在第一次调用cancel()方法时被创建,并在第一次调用cancel()方法后被关闭。children是一个map,用于保存子Context,子Context在调用cancel()方法时会被移除。err和cause是错误信息,err是取消的原因,cause是取消的源头。
cancelCtx实现canceler的接口
func (c *cancelCtx) cancel(removeFromParent bool, err, cause error) {
	if err == nil {
		panic("context: internal error: missing cancel error")
	}
	if cause == nil {
		cause = err
	}
	c.mu.Lock()
	if c.err != nil {
		c.mu.Unlock()
		return // already canceled
	}
	c.err = err
	c.cause = cause
	d, _ := c.done.Load().(chan struct{})
	if d == nil {
		c.done.Store(closedchan)
	} else {
		close(d)
	}
    //遍历所有的子Context,进行取消
	for child := range c.children {
		// NOTE: acquiring the child's lock while holding parent's lock.
		child.cancel(false, err, cause)
	}
	c.children = nil
	c.mu.Unlock()

	if removeFromParent {
		removeChild(c.Context, c) //从父节点移除子节点
	}
}

func (c *cancelCtx) Done() <-chan struct{} {
	d := c.done.Load()
	if d != nil {
		return d.(chan struct{})
	}
	c.mu.Lock()
	defer c.mu.Unlock()
	d = c.done.Load() //二次检查
	if d == nil {
		d = make(chan struct{})
		c.done.Store(d)
	}
	return d.(chan struct{})
}当我们调用WithCancel(),实际上就会创建一个cancelCtx类型的Context。
func WithCancel(parent Context) (ctx Context, cancel CancelFunc) {
	c := withCancel(parent)
	return c, func() { c.cancel(true, Canceled, nil) }
}

func withCancel(parent Context) *cancelCtx {
	if parent == nil {
		panic("cannot create context from nil parent")
	}
	c := &cancelCtx{}
	c.propagateCancel(parent, c)
	return c
}其中,最为核心的是c.propagateCancel(parent, c),它将父子Context关联起来。
func (c *cancelCtx) propagateCancel(parent Context, child canceler) {
	c.Context = parent  //记录父实例

	done := parent.Done()
	if done == nil {
		return // parent is never canceled
	}

	select {
	case <-done:
		// parent is already canceled
		child.cancel(false, parent.Err(), Cause(parent))
		return
	default:
	}

	if p, ok := parentCancelCtx(parent); ok { //如果父节点是可取消的Context
		// parent is a *cancelCtx, or derives from one.
		p.mu.Lock()
		if p.err != nil {
			// parent has already been canceled
			child.cancel(false, p.err, p.cause)
		} else {
			if p.children == nil {
				p.children = make(map[canceler]struct{})
			}
			p.children[child] = struct{}{}   //将当前cancelCtx添加到父节点的children中
		}
		p.mu.Unlock()
		return
	}

	if a, ok := parent.(afterFuncer); ok {
		// parent implements an AfterFunc method.
		c.mu.Lock()
		stop := a.AfterFunc(func() {
			child.cancel(false, parent.Err(), Cause(parent))
		})
		c.Context = stopCtx{
			Context: parent,
			stop:    stop,
		}
		c.mu.Unlock()
		return
	}

	goroutines.Add(1)
	go func() {
		select {
		case <-parent.Done():
			child.cancel(false, parent.Err(), Cause(parent))  //启动一个协程,等待父节点取消。一旦父节点取消,则将子节点也取消
		case <-child.Done():
		}
	}()
}
有超时时间的Context
Go语言提供了
WithDeadline()和WithDeadlineCause()函数用于创建一个带超时时间的Context。我们先看一下这个带超时时间的Context的定义:
type timerCtx struct {
	cancelCtx
	timer *time.Timer
	deadline time.Time
}我们可以看到timerCtx继承了cancelCtx,具有可取消功能,同时为了实现超时控制,增加了timer和deadline字段。
timerCtx重写了Deadline()函数,如下:
func (c *timerCtx) Deadline() (deadline time.Time, ok bool) {
	return c.deadline, true
}此外,timerCtx还重写了cancel()函数,如下:
func (c *timerCtx) cancel(removeFromParent bool, err, cause error) {
	c.cancelCtx.cancel(false, err, cause)
	if removeFromParent {
		// Remove this timerCtx from its parent cancelCtx's children.
		removeChild(c.cancelCtx.Context, c)
	}
	c.mu.Lock()
	if c.timer != nil {
		c.timer.Stop()
		c.timer = nil
	}
	c.mu.Unlock()
}我们通过WithDeadline和WithDeadlineCause函数创建一个timerCtx类型的Context。
func WithDeadline(parent Context, d time.Time) (Context, CancelFunc) {
	return WithDeadlineCause(parent, d, nil)
}

func WithDeadlineCause(parent Context, d time.Time, cause error) (Context, CancelFunc) {
	if parent == nil {
		panic("cannot create context from nil parent")
	}
	if cur, ok := parent.Deadline(); ok && cur.Before(d) {   //如果父Context已经设置了超时时间,并且当前超时时间早于新的超时时间,则直接返回一个取消的Context
		// The current deadline is already sooner than the new one.
		return WithCancel(parent)
	}
	c := &timerCtx{
		deadline: d,
	}
	c.cancelCtx.propagateCancel(parent, c) //将父子Context关联起来
	dur := time.Until(d)
	if dur <= 0 {
		c.cancel(true, DeadlineExceeded, cause) // deadline has already passed
		return c, func() { c.cancel(false, Canceled, nil) }
	}
	c.mu.Lock()
	defer c.mu.Unlock()
	if c.err == nil {
		c.timer = time.AfterFunc(dur, func() {  //使用time.AfterFunc创建一个定时器,在定时器超时后调用c.cancel()函数取消Context。
			c.cancel(true, DeadlineExceeded, cause)
		})
	}
	return c, func() { c.cancel(true, Canceled, nil) }
}
我们可以看到timerCtx集成了cancelCtx,并实现了超时控制逻辑。
取消回调的Context
Go语言提供AfterFunc函数,用于在Context取消后执行回调函数。其本质上创建了一个afterFuncCtx,它的定义如下:
type afterFuncCtx struct {
	cancelCtx
	once sync.Once // either starts running f or stops f from running
	f    func()
}
其中:
once是一个sync.Once类型的变量,用于确保回调函数只执行一次。f是一个回调函数,用于在Context取消后执行。
我们看到afterFuncCtx继承了cancelCtx,那么它是如何实现取消时回调功能呢?
func (a *afterFuncCtx) cancel(removeFromParent bool, err, cause error) {
	a.cancelCtx.cancel(false, err, cause)
	if removeFromParent {
		removeChild(a.Context, a)
	}
	a.once.Do(func() {
		go a.f()
	})
}我们可以看到afterFuncCtx重写了cancel函数,当Context取消时,会执行回调函数。once.Do()方法确保回调函数只执行一次。
那么afterFuncCtx是怎么创建的呢?
func AfterFunc(ctx Context, f func()) (stop func() bool) {
	a := &afterFuncCtx{
		f: f,
	}
	a.cancelCtx.propagateCancel(ctx, a)  //关联父子Context
	return func() bool {
		stopped := false
		a.once.Do(func() {
			stopped = true
		})
		if stopped {
			a.cancel(true, Canceled, nil)
		}
		return stopped
	}
}
注意
这里注意返回stop函数。如果在没有结束前执行了stop函数,将导致once函数执行,这样回调函数将不会执行。
完整的UML
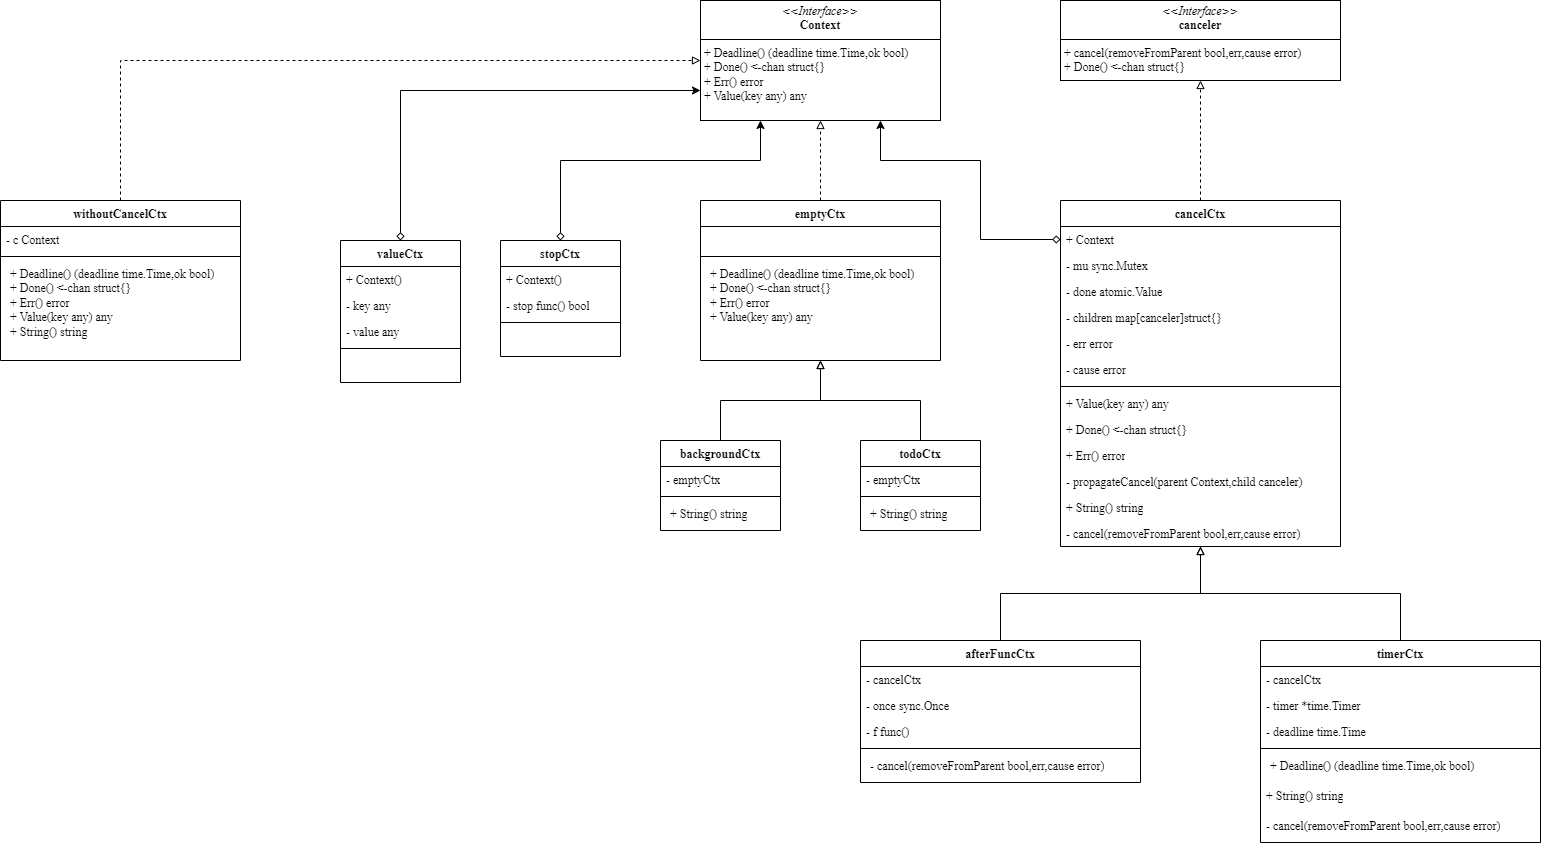
Go语言提供了丰富的Context,用于超时控制、取消控制、传递数据等。
其核心是cancelCtx类型,timerCtx和afterFuncCtx类型都继承了cancelCtx。分别重写了相应的方法,实现了超时控制和取消回调功能。
此外需要关注Context如何将父子关联起来。